Getting Started with AVR Microcontrollers
The first step in getting started with microcontrollers is to choose a microcontroller family to work with. Their are hundreds different microcontroller families from many different manufactures.
Selecting a Microcontroller
There are two family of microcontroller that are extremely popular among hobbyist. The “PIC” series from Microchip and “AVR” series from Atmel. Both these chips are wonder of modern microelectronics. PIC had ruled for a long time but now AVR is also getting in serious competition.Speed and ease of use.
I prefer AVRs because one major reason. They are fast. When a PIC and an AVR is running with same frequency lets say 16 MHz, then the AVR is actually executing four times faster than the PIC ! Yes 4 times faster. This is because the PIC requires 4 cycle to perform a single execute cycle while the AVR execute most of the instruction in 1 clock cycle. In addition, I like the AVR architecture because of its consistency. It makes using the most advanced feature of AVR very easy to use. These chips are easily available and they are cheap.Free “C” compiler.
One more important thing, generally microcontroller programs are written in assembly language for efficiency. Which you may know is a very low level and unstructured language. Therefore, to achieve a small thing lots of code need to be written and the programmer cannot concentrate on program logic. This makes the things harder. However, mid to high end AVR MCUs are powerful enough to support high level language such as C efficiently. To write programs in ‘c’ for AVR or any other microcontroller we need a c compiler for that MCU. Generally these compilers are priced so high that they are out of reach of hobbyist and small companies. But fortunately for AVR MCUs there is a very high quality ‘c’ compiler for free. It is GNU C compiler. It is extremely popular and it has a large user base. It is part of the free and open source software revolution that we are witnessing (like Linux, PHP, Apache, Open Office.org etc). Providing excellent software at no cost. They are the work of dedicated programmers around the globe.Different AVRs

Now we have selected AVR as our choice of microcontroller, let us see what different AVRs are available. The popular microcontrollers of AVR family are
- AT TINY2313 [20 PIN, 2K Flash ,128 Byte RAM, 128 Bytes EEPROM]
- ATmega8 [28 PIN , 8K Flash , 1KB Ram, 512 Byte EEPROM]
- ATmega16 [ 40 PIN, 16K Flash, 1KB Ram, 512 Byte EEPROM]
- ATmega32 [ 40 PIN, 32K Flash, 2KB Ram, 1KB EEPROM]
You can choose any one of them according to your need. In the above list we have mentioned the key parameter of the MCU. These parameters includes :-
- The number of pins that MCU is having for example ATmeg8 has 28 pins while ATmega16 has 40 pins. The more the number of pin a MCU has the more external hardware you can add to it at the same time. But it will be bigger in size and costly. So for cheaper and smaller final product you need to select the MCU with the minimum number of pins you can manage to attach all external peripherals.
- Amount of Flash Memory: The flash memory is where the main program of MCU is stored. Thus more the flash memory the bigger and more complex program it can store. In the same time a MCU with larger flash memory tends to be more expensive. So the bottom line is to select the MCU which can just hold your final program. Example ATmega8 has 8K Flash.
- Amount of RAM: All the data hold by the MCU during runtime are stored in RAM. So more the ram it can store more data at runtime. ATmega8 has 1KB RAM.
- Amount of EEPROM: If the MCU program collected some data (like a password from user) it is stored in RAM. But MCU cannot retain this data if the power to MCU is interrupted. To hold data without the power supply MCU need to write it to its internal EEPROM. Once data is written to EEPROM. It does NOT require power to retain its value. On next startup the MCU can read this data from EEPROM. From the list you can see that ATmega8 has 512 bytes of EEPROM while ATmega32 has 1KB of EEPROM.
The concepts you learn from one MCU can be easily applied for any AVR provided that chip has that functionality. For Example you learned to use ADC (analogue to digital converter) on ATmega8 then you can easily use ADC on any AVR that has one (like ATmega16 or ATmega32). In this tutorial series we will be using ATmega8 because it has right combination of size, cost and features. It has lots of RAM and Flash to make moderate sized project with ease. Also it has many on chip peripherals like
- Timers with PWM.
- USART for connection with PC and other microcontroller.
- SPI can be used for connection with other chips like Data Flash, Graphical LCD, Memory Cards.
- TWI (I2C) Two Wire Interface to communicate with memory chips, real time clock, accelerometers etc.
- Analogue to Digital Converter.
If you don’t understand the above features no need to worry. Each will be having its own dedicated tutorials. Just understand they are integrated inside the chip to make your life easier.
Development Process

MCU based development process.
Therefore, the tools you need are
Hardware
- A PC running WinXP or Better.
- An In-System programmer (ISP): This is the device which connects your MCU to your PC for downloading programs to the Flash memory.
- A Development Board: It is nothing but your project which has an ISP header so that programmer can be connected and disconnected easily when required. In most simple case, it has a MCU with its power supply, a few basic connections, and ISP header.
- Last but not the least an AVR MCU
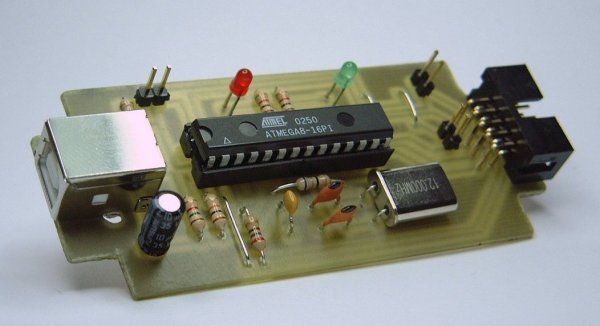
USB programmer ( home made -low cost )A Typical USB Port Based ISP Programmer
The development board has- A Microcontroller.
- A 12V to clean 5V regulator circuit. This section has a connecter for a DC Adapter so that you can power it up easily from the main supply of your house. A switch is provided to control the main power of the board, an LED provides indication of good power in the board.
- A crystal oscillator to provide clock to the MCU.
- A reset circuit to keep MCU in running state normally and to reset it when reset switch is pressed.
- An ISP Circuit to allow downloading program to the MCU. It has a 5x2 PIN male FRC Connecter where you can connect the above shown programmer.
- All other pins of the MCU are made available on male headers to that they can be easily connected to external devices as required by your project.
- Some free prototyping area (the PCB area where you can insert and solder any component and connect it with MCU)
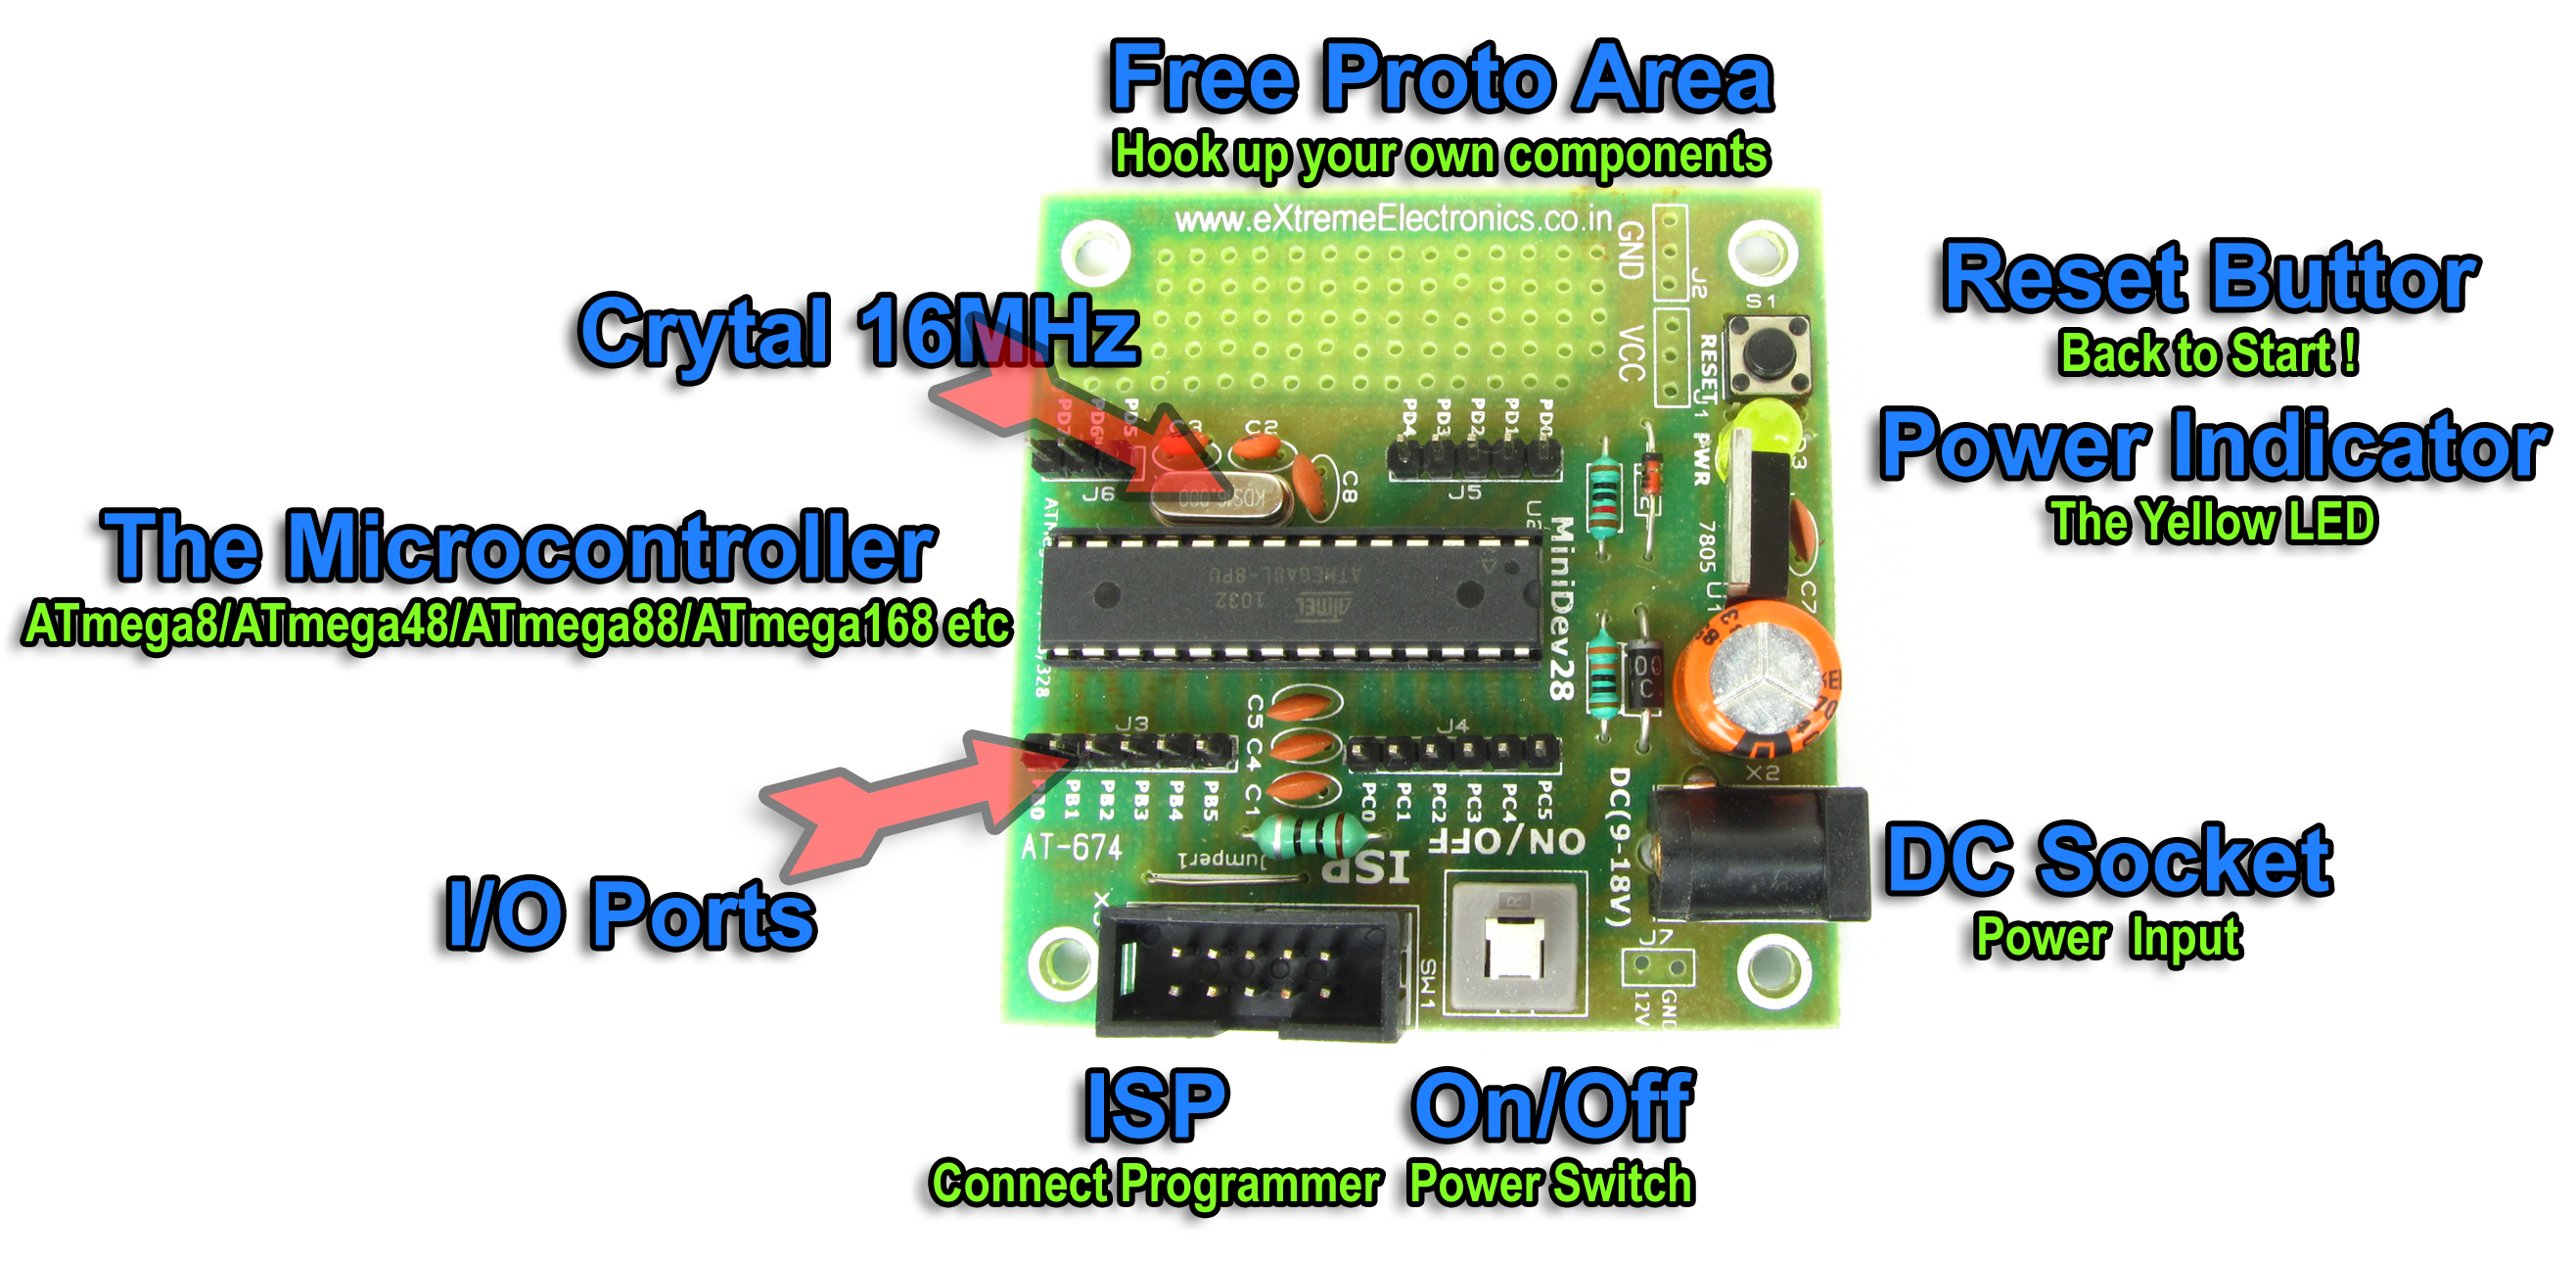
A Low Cost Development Board
- Software
- A C compiler (free) This will compile your program which is written in a high-level language to machine language. After successful compilation and build you will get a file with .hex extension, which you have to burn into the MCU’s flash memory.
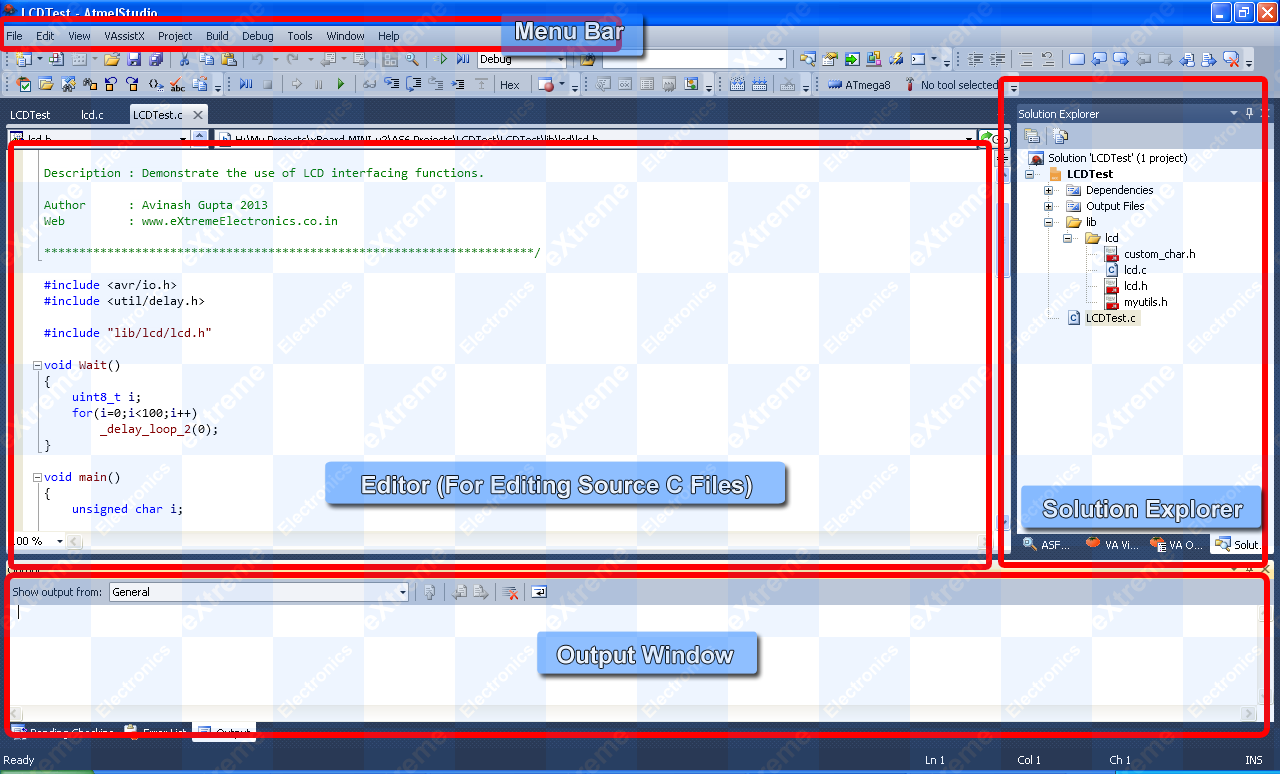
- An Integrated Development Environment (IDE) (free): The IDE is a software that help you write and edit programs, organise different files of a project. Easily give commands using menus or tool bar to compile and build the project. The IDE supporting all Atmel microcontrollers is provide by Atmel Corp. itself. The latest IDE form Atmel is Atmel Studio 6. It can be downloaded free of cost. Atmel Studio 6 has built is avr-gcc C compiler so you don't need to install is separately.
- A programmer software free (free) This software will help you burn the above mentioned hex file to MCU flash. We will us eXtreme Burner - AVR which is easy to use, supports USB ports and runs on modern OSs like Windows Vista and Windows 7.

Atmel Studio 6

No comments:
Post a Comment